With just a little time, tools and know-how, installing a new fan yourself is a task that’s not out of reach.
Installing a ceiling fan in a room can provide a much needed breeze in the warm summer months as well as push heat down from the ceiling in the colder winter months. With all of the ceiling fan options available today, they are not only functional but decorative.
What you will need?
- Proper size ceiling fan for the room
- Ceiling fan mounting kit ? may be included with the fan
- Ladder that is tall enough to allow the installer’s head to reach the ceiling
- Tools: wire cutters/strippers, screwdrivers, pliers
- Wire nuts ? often referred to as wire connectors
- Electrical tape
- Electrical tester ? to make sure the wires are not ?hot? when you’re working with them
- Safety glasses
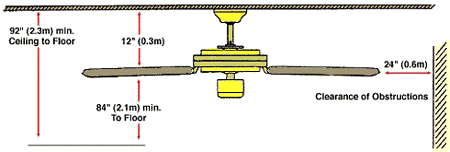
Determining the Correct fan Size
There’s nothing worse than having a fan that’s too small for the room it is in. In order to make sure you are getting the correct size fan for the space you will need to measure the length and width of the largest part of the room.
- For rooms 12 feet or less use a 36-inch fan
- For rooms that are between 12 feet and 15 feet use a 42-inch diameter fan
- For rooms that are over 15 feet use a 52-inch fan
Preparing for Installation
- Remove the old fixture or existing ceiling fan. It is a good idea to turn off the power to the fixture prior to beginning the process. If possible, place a tag on the electrical panel to ensure others know why the power is off.
If you are planning to install a ceiling fan where there is not an existing fixture, you may need to enlist the assistance of a professional electricianas additional wiring will need to be run to the location you have chosen. In addition, a professional electrician will be able to determine whether or not any additional electrical repair is needed prior to beginning the installation process.
- Remove the new ceiling fan from the box and display the parts in an area where they are safe. Use the included instructions to remove the mounting bracket from the motor of the fan, according to the instructions. The mounting bracket will be placed on the electrical box in the ceiling and secured using screws. Prior to screwing the mounting bracket in place, make sure the electrical wires have been pulled through the bracket.
- Choose the mounting hardware. Is the fan going to be installed on a downrod or close mounted to the ceiling? Follow the package instructions to install the downrod. For close mounted fans, the following applies:
- Make sure the screws and washers are removed from the top of the decorative mount that will be flush with the ceiling.
- Run the wires through the decorative mount and secure the mount or canopy to the mounting bracket with the screws that were removed in step 1 above.
- Attach all wires to one another, following the instructions that were included with the fan. Normally, same-colored wires will be connected to one another. Secure all connections with wire nuts or wire connectors.
Make sure all connections are secure and all screws are tightened.
Now it’s time to attach the blades to the fan. Begin by screwing the bracket onto the blade, and then screwing the bracket into the correct position on the fan. Repeat the process for every blade.?Ceiling fans that have lights will need to have the globe or globes and light bulbs installed as well. Make sure the bulbs are the appropriate wattage for the fan.Turn the power back on and check that the fan works. If the ceiling fan is not working you will need to check the ceiling fan wiring.
Installing a ceiling fan is a great project for the do-it-yourselfer. With a few tools and a little time, a ceiling fan can add a touch of class to any room.
Special thanks to our guest blogger, J Five Electric has a team of electricians in Plano, TX that specialize in ceiling fan installation, rewiring, and other electrical repairs.